网站架构
网站架构使用Github pages作为存储服务,并提供Web访问,Hugo作为静态博客框架,PaperMod作为Hugo的主题,并搭配Github Actions进行自动编译与发布。
发布一篇文章的流程是这样的:
- 本地使用Markdown撰写一篇文章
- 通过git同步至github仓库
- Github Actions自动编译成静态站点并部署至Github Pages
参考: https://www.elegantcrazy.com/posts/blog/build-blog-with-github-pages-hugo-and-papermod/
下载hugo,配置环境变量
下载源码或者编译好的exe文件(windows-amd64.zip): https://github.com/gohugoio/hugo
配置环境变量,
hugo version查看版本在hugo-blog目录中创建项目
hugo new site hugo-blog创建完成后,根目录 hugo-blog 包含以下文件
├─archetypes # 目录下的default.md是生成博文的模版
├─assets # 存放被 Hugo Pipes 处理的文件
├─content # 存放markdown文件作为博文内容
├─data # 存放 Hugo 处理的数据
├─i18n # 国际化相关的内容
├─layouts # 存放布局文件
├─static # 存放静态文件 图片 CSS JS文件
└─themes # 存放不同的主题
└─hugo.yaml # 博客配置文件支持 JSON YAML TOML 三种格式配置文件
配置主题
安装PaperMod主题
cd hugo-blog
git init
git submodule add --depth=1 https://github.com/adityatelange/hugo-PaperMod.git themes/PaperMod
更新主题
如果是clone别人的项目,或者是在另一台电脑上重新clone了自己的项目,需要进行初始化
git submodule update --init --recursive如果要更新主题
git submodule update --remote --merge
启用主题
由于Hugo的默认配置文件为toml格式,而PaperMod主题样例配置文件为yaml格式,因此需要删除根目录下的config.toml文件,新建config.yml文件,
然后复制PaperMod的样例配置文件https://github.com/adityatelange/hugo-PaperMod/wiki/Installation#sample-configyml,这里给出当前版本的文件,注意该文件可能随着版本更新而变化,请尽量从官方文档获取,以避免配置项更新导致的报错
新建文章
在网站中添加第一篇文章
hugo new posts/my-first-post.md
Hugo在content/posts/目录下创建文件,用编辑器打开该文件
title = 'My First Post'
date = 2024-02-26T10:05:17+08:00
draft = true
注意draft的值是true,表示当前文档是草稿。默认情况下,Hugo在编译网站时不会发布草稿。
以markdown格式在文件中编写文章
保存文件,启动Hugo的开发服务,使用-D命令来包含草稿文章
hugo server -D
控制台会输出本地网站的URL。当文章的内容有修改时,Hugo会自动重新编译网站。
发布网站
发布网站是指Hugo在public目录下编译生成静态页面,包含HTML文件、图片、CSS文件以及JS文件。但此时网站还没有部署,我们需要搭配Github Pages将生成的静态界面部署在服务器上。
如果使用Github Actions自动发布与部署,则本地发布的步骤可以省略。
本地发布
hugo
定制网站
修改网站基本信息
PaperMod的示例配置文件并不能满足我们的需求,需要进行逐一定制,这里列出一些建议修改的配置项
baseURL: "https://xxx.github.io/" # 首页地址
title: "xxx's blog" # 首页标题

# googleAnalytics: xxx # google analytics在国内无法访问,需要注释掉以加快访问速度

params:
  title: "xxx's blog" # 首页标题
  description: "xxx" # 页面描述
  keywords: [Blog, xxx] # 首页的关键词
  author: xxx # 文章中默认显示的作者名字
  DateFormat: "2006-01-02" # 将时间格式修改为国内常用格式
  ShowCodeCopyButtons: true # 显示复制代码按钮
  showtoc: true # 在每篇文章开头显示目录

  # 各种图标的地址,如果没有就全部注释掉
  # assets:
    # favicon: "<link / abs url>"
    # favicon16x16: "<link / abs url>"
    # favicon32x32: "<link / abs url>"
    # apple_touch_icon: "<link / abs url>"
    # safari_pinned_tab: "<link / abs url>"

  # PaperMod支持Regular、Home-Info和Profile三种模式,具体参阅 https://github.com/adityatelange/hugo-PaperMod/wiki/Features#regular-mode-default-mode
  profileMode:
    enabled: false # needs to be explicitly set
    title: "xxx's blog"
    subtitle: "This is subtitle"
    imageUrl: "<img location>"
    imageWidth: 120
    imageHeight: 120
    imageTitle: my image
    buttons:
      - name: Posts
        url: posts
      - name: Tags
        url: tags
  homeInfoParams:
    Title: "xxx"
    Content: xxx

  socialIcons:
    - name: github
      url: "https://github.com/xxx" # 个人Github地址
    - name: email
      url: "mailto://xxx@xxx.com" # 个人邮箱

  # 用于搜索引擎验证网站所有权,如果不用就注释掉
  # analytics:
    # google:
    #   SiteVerificationTag: "XYZabc"
    # bing:
    #   SiteVerificationTag: "XYZabc"
    # yandex:
    #   SiteVerificationTag: "XYZabc"

  editPost:
    URL: "https://github.com/xxx/xxx.github.io/blob/main/content" # 填入Github仓库的地址
    Text: "提交修改建议"
    appendFilePath: true # 是否在URL后加入文件路径

# 网站右上角的菜单列表
menu:
  main:
    - identifier: archives # 需做额外配置,具体参考下文
      name: 归档
      url: /archives/
      weight: 10
    - identifier: categories
      name: 分类
      url: /categories/
      weight: 20
    - identifier: tags
      name: 标签
      url: /tags/
      weight: 30
    - identifier: search # 需做额外配置,具体参考下文
      name: 搜索
      url: /search/
      weight: 40
添加搜索页面
PaperMod使用 Fuse.js Basic 实现搜索功能。
在config.yml中加入下列配置项
outputs:
    home:
        - HTML
        - RSS
        - JSON # is necessary
在content目录下创建search.md,内容如下
---
title: "搜索" # in any language you want
layout: "search" # is necessary
summary: "search"
placeholder: "搜索框中的提示语"
---
如果要使某篇文章不被搜索,在文章开头添加下列配置项
---
searchHidden: true
添加归档页面
在content目录下创建archives.md,内容如下
---
title: "归档"
layout: "archives"
url: "/archives/"
summary: archives
---
添加访问量统计功能
Google Analytics注册
Google Analytics——全球最流行的网站流量分析工具。
Google Analytics(简称GA)是谷歌推出的一款用于数据收集、加工、分析工具。我们需要在网站上插入GA代码才能使它工作。
GA能帮我们收集访客在我们网站上的访问路径、转化记录、转化金额、访客来源国家等;我们可以通过查看GA平台上预设的报表或者自定义报表来了解整个网站的各项数据,进而优化我们的运营策略。
进入GA4官网:https://analytics.google.com/
账号名称填自己能够识别的名称,底下的选择框默认,进入下一步
媒体资源设置。务必将时区设置成与网站时区、谷歌广告时区一致!
当然,这里即使设置错了也不要着急,之后在
GA设置>媒体资源设置>媒体资源详细信息里面可以进行更改的。高级选项里有一个Universal Analytics的设置,现在已经没必要开了。填写商家信息。这里的内容随便勾选,点击创建按钮,并接受随后弹窗里的两项服务条款,完成账号创建。
进入到GA设置界面后,会让我们选择数据收集的来源,此时选择
网站在出来的设置数据流界面,填入我们的域名以及可识别的数据流名称(主要为了区别web网站、app等不同渠道)。增强型衡量功能设置全部保持默认即可。
创建之后将会弹出网站数据流详情的界面,我们之后会用到衡量ID。这个页面先别关,后面在进行基础设置时还要继续在这个界面操作。
好了,到此GA4就注册好了,接下来就是为网站添加GA4代码。
参考: https://gohugo.io/templates/internal/
hugo开启 GA
googleAnalytics: G-MEASUREMENT_ID # 上一步获取的GA追踪id
将 Google Analytics(分析)内部模板包含在您希望代码显示的模板中
Hugo提供了在不修改themes/PaperMod/layouts/partials/head.html的情况下自定义页面头的能力,这样就不需要修改themes/PaperMod下的文件,保证更新主题后不需要额外进行修改。
在项目根目录的layouts/partials下新建extend_head.html,加入如下代码
{{ template "_internal/google_analytics.html" . }}
在Github Pages上部署网站
参考: https://gohugo.io/hosting-and-deployment/hosting-on-github/
创建Github远程仓库
在Github创建仓库,仓库名填写
[用户名].github.io,注意[用户名]部分必须是Github用户名,否则Github Pages不会正常工作。点击
Create Repository,创建仓库在根目录下创建
.gitignore,内容如下public resources .hugo_build.lock将本地仓库推送至Github
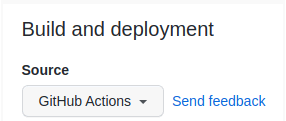
git init
git add . # 添加文件
git commit -m "first commit" # 首次提交
git branch -M main # 切换到main分支
git remote add origin github仓库地址 # 关联远端github仓库
git push -u origin main # 推送到main
访问Github仓库,选择 Settings > Pages ,在
Build and deployment下的source选项 切换为GitHub Actions类似于DockerFile的自动部署文件
在本地存储库中创建一个空文件
.github/workflows/hugo.yaml,内容如下新建文件夹
.github,子文件夹workflows,新建文件 hugo.yaml# Sample workflow for building and deploying a Hugo site to GitHub Pages name: Deploy Hugo site to Pages on: # Runs on pushes targeting the default branch push: branches: - main # Allows you to run this workflow manually from the Actions tab workflow_dispatch: # Sets permissions of the GITHUB_TOKEN to allow deployment to GitHub Pages permissions: contents: read pages: write id-token: write # Allow only one concurrent deployment, skipping runs queued between the run in-progress and latest queued. # However, do NOT cancel in-progress runs as we want to allow these production deployments to complete. concurrency: group: "pages" cancel-in-progress: false # Default to bash defaults: run: shell: bash jobs: # Build job build: runs-on: ubuntu-latest env: HUGO_VERSION: 0.123.0 steps: - name: Install Hugo CLI run: | wget -O ${{ runner.temp }}/hugo.deb https://github.com/gohugoio/hugo/releases/download/v${HUGO_VERSION}/hugo_extended_${HUGO_VERSION}_linux-amd64.deb \ && sudo dpkg -i ${{ runner.temp }}/hugo.deb - name: Install Dart Sass run: sudo snap install dart-sass - name: Checkout uses: actions/checkout@v4 with: submodules: recursive fetch-depth: 0 - name: Setup Pages id: pages uses: actions/configure-pages@v4 - name: Install Node.js dependencies run: "[[ -f package-lock.json || -f npm-shrinkwrap.json ]] && npm ci || true" - name: Build with Hugo env: # For maximum backward compatibility with Hugo modules HUGO_ENVIRONMENT: production HUGO_ENV: production run: | hugo \ --gc \ --minify \ --baseURL "${{ steps.pages.outputs.base_url }}/" - name: Upload artifact uses: actions/upload-pages-artifact@v2 with: path: ./public # Deployment job deploy: environment: name: github-pages url: ${{ steps.deployment.outputs.page_url }} runs-on: ubuntu-latest needs: build steps: - name: Deploy to GitHub Pages id: deployment uses: actions/deploy-pages@v3创建一次提交,推送至远程
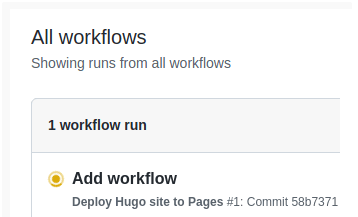
git add .
git commit -m "Add workflow"
git push
在Github仓库页面,点击 Actions ,可以看到工作流的状态
当 GitHub 完成站点的构建和部署后,状态指示器的颜色将变为绿色
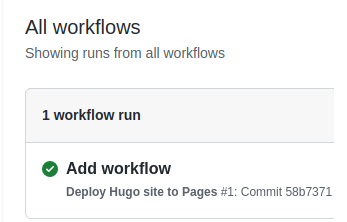
单击提交消息,如上所示。你会看到这个
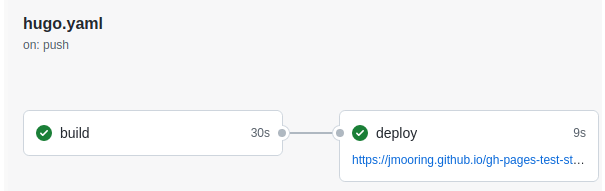
在
deploy步骤下,您将看到指向您的实时站点的链接。将来,每当您从本地存储库推送更改时,GitHub 都会重建您的站点并部署更改。
git add .
git commit -m "xxx"
git push
关于图片引用的几个方案
引用图床
在
static目录下存放图片,引用时,通过如下方式引用 (映射static目录)比typora的格式多了个
/typora编辑,图片文件夹移动到
static,引用路径添加下/
总结
发布新blog,在xxx.github.io仓库下直接更新
新建blog,bash(或者手动新建): hugo new posts/my-first-post.md
编辑md文档
hugo发布,bash: hugo
更新仓库
git add . git commit -m “xxx” git push
等待仓库自动部署网站
以上就是使用Hugo+Github Pages+PaperMod搭建博客的全部流程,搭建好的博客具有以下特性:
- 静态页面无需本地生成,更新时只需提交源码文件
- 支持总访问量、访客数、文章阅读数统计
升级 : Build failed because it uses a deprecated version of actions/upload-artifact: v3
Build failed because it uses a deprecated version of actions/upload-artifact: v3
在 .github/workflows/xxx.yaml 中…
| 旧值 | 新价值 |
|---|---|
actions/cache@v3 | actions/cache@v4 |
actions/configure-pages@v3 | actions/configure-pages@v5 |
actions/deploy-pages@v2 | actions/deploy-pages@v4 |
actions/upload-pages-artifact@v2 | actions/upload-pages-artifact@v3 |
peaceiris/actions-hugo@v2 | peaceiris/actions-hugo@v3 |